
Kitchen decor ideas are easy to find for big houses, but a small rental kitchen lives or dies by its counter. One short stretch of worktop has to hold the cooking oils, the coffee things, the fruit, the post and every gadget with nowhere else to live, so it looks cluttered again an hour after you clear it. There is no floor space for extra storage furniture, and the lease rules out fitting any. The answer is kitchen counter decor that earns its footprint: pieces that look styled on purpose and quietly hold the mess at the same time.
These twelve kitchen counter decor ideas do both jobs at once. A tiered stand lifts the daily oils and spices off the surface, matching jars turn open packets into one calm row, a tray gives coffee its own small territory, and one vase of flowers does the decorating while everything else does the hiding. Every idea stands on the counter, leans on the wall or lifts straight off again, so nothing here needs a drill, a favour from the landlord or a repair on moving day.
Table of Contents
- Kitchen Counter Decor Ideas Start With One Tray, Then Build Around It
- Put Daily Oils and Spices on a Two-Tier Stand
- Park Utensils Upright in One Crock Beside It
- Give Coffee Its Own Tray and Corner
- Go Vertical Without Drilling: Small Kitchen Counter Storage Ideas
- Lift the Counter With a Freestanding Corner Riser
- Use Open Shelves for the Pretty Dry Goods
- Pretty Containers That Hide the Mess: Kitchen Counter Organization Ideas
- Decant Staples Into Matching Jars
- Lean a Big Wooden Board Behind the Counter Clutter
- Keep Daily Appliances as a Matched Pair
- One Decorative Moment, Not Five: How to Decorate a Small Kitchen Counter
- Set One Vase of Flowers as the Counter Focal Point
- Style a Single Round Tray as the Still Life
- Rotate One Seasonal Bowl or Candle
- The Daily Reset That Keeps a Small Kitchen Counter Clear
- Run a Two-Minute Reset and a One-In-One-Out Rule
- 5 Mistakes That Make a Small Kitchen Counter Worse
- FAQs About Small Kitchen Counter Decor Ideas
Kitchen Counter Decor Ideas Start With One Tray, Then Build Around It
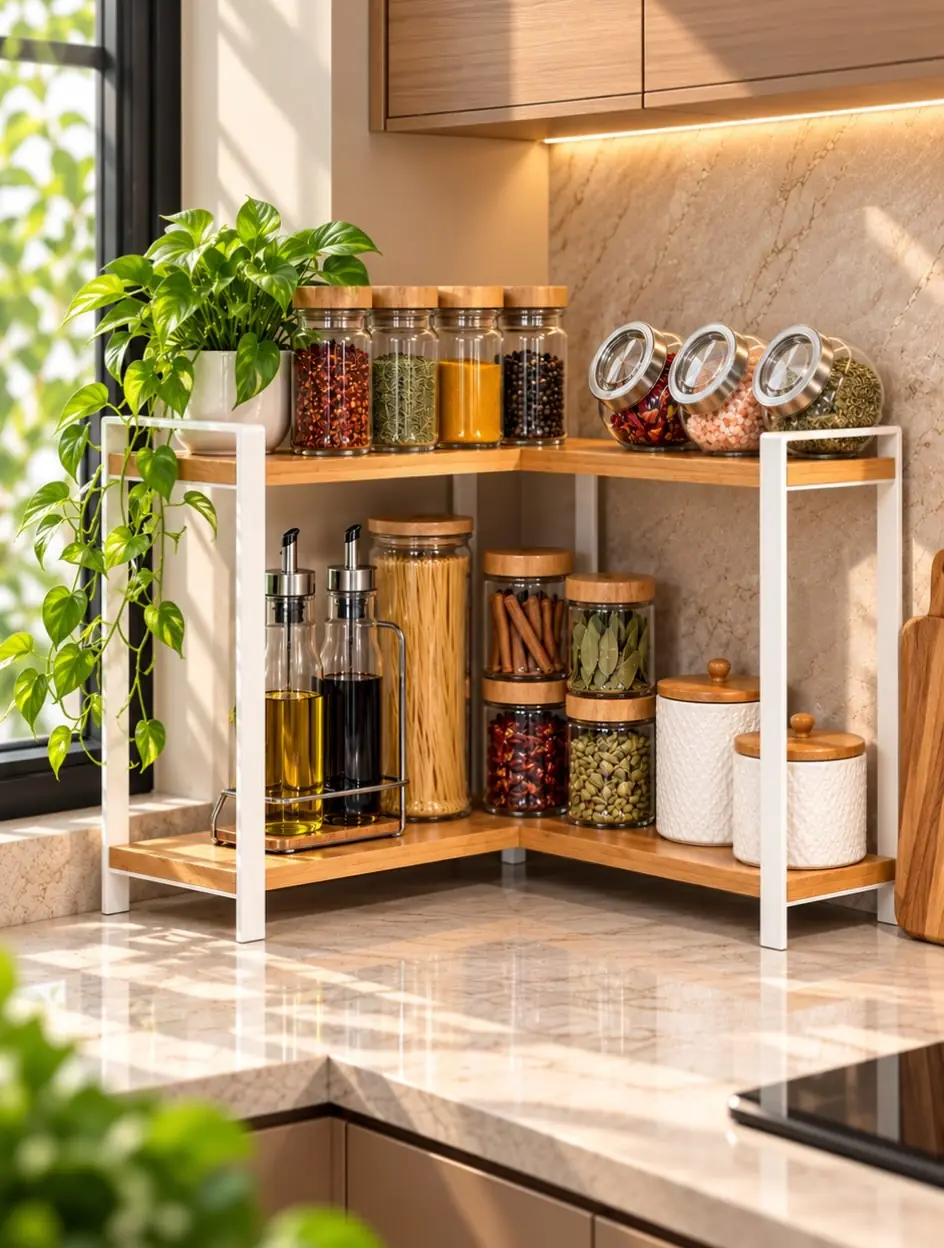
A small counter fails one loose object at a time. The oil bottle lands by the stove, the spice jars form a crowd behind it, the utensils sprawl by the sink, and within a week the whole worktop is a parking lot. The corner shelf in this photo shows the opposite habit: a two-tier stand with light wood shelves and a white frame has taken over the dead corner by the window, jars of spices along the top, oil and vinegar bottles below, and a trailing green plant softening the edge. One object, holding twenty. That is the shape of this whole first group.
Start by giving the daily things one shared address. A tray, a stand or a corner riser becomes the home base, and everything that cooks every day lives there or nowhere. The hero buy of this article is exactly that home base: a tiered stand, and the version worth hunting for is the tiered bamboo countertop organizer tray, because bamboo is light, warm to look at and kind to a rental budget. It corrals oils, spices and utensils into one tidy footprint, and the rest of the counter suddenly reads empty, even though almost nothing has left the kitchen.
Build the group in order. The stand goes where cooking actually happens, close to the stove. The utensil crock parks beside it, upright and within reach. Coffee gets pushed to the far end and given its own small tray, so the morning things stop wandering into the chopping zone. Three zones, three containers, and a small counter starts to behave like a much bigger one.
Group 1: The home base
Stand: the tiered home base for oils, spices and daily jars
Crock: utensils upright beside the stand, never in a drawer tangle
Coffee: its own small tray at the far end of the counter
1. Put Daily Oils and Spices on a Two-Tier Stand
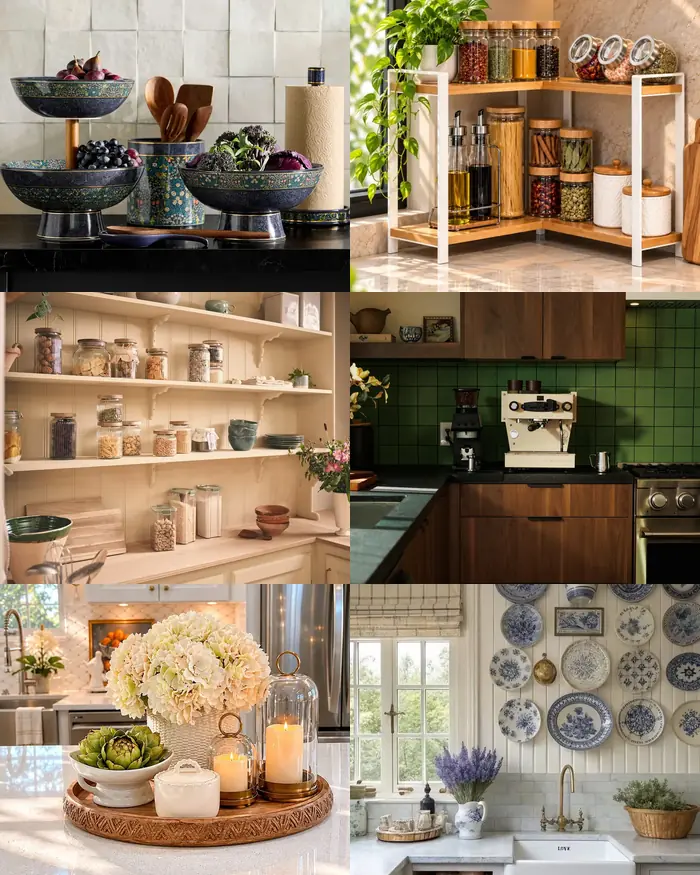
On a black counter against cream tiles, this two-tier stand wears dark patterned bowls with a floral band: figs and plums in the top bowl, grapes spilling below, and beside it a matching crock of wooden spoons and a pedestal bowl of leafy greens. It is styled, yes, but look at the work it is doing. Everything that once spread itself across the counter now stands inside one footprint about the size of a dinner plate. In your own kitchen the bowls and shelves hold the things you grab mid-cooking: the oil, the salt, the pepper, the three or four spice jars that appear in almost every meal.
Tiers work because they sort by height and habit at the same time. Small jars go up top where your eyes land first, so there is no digging while a pan is hot. Tall bottles stand below, where their weight keeps the stand steady. Group by how often you reach, not by category: the daily oil and the daily spice should be neighbours even if a shop would shelve them apart. Keep the stand within easy reach of the stove but just outside the splash line, and it will stay clean with almost no effort.
The renter details matter as much as the styling. A stand needs no fixing of any kind, and because it is one object, it lifts off in one hand so the counter under it can be wiped properly, which never happens under a loose crowd of bottles. Before buying, tape the footprint on your counter and live with the outline for a day; a stand that swallows the chopping zone is worse than none. Bamboo, wood, metal and ceramic all do the job, so match the tone to your boards or your crock and the corner reads as one set instead of three purchases.
Tier logic
Top tier for the small jars you grab mid-cooking, bottom tier for tall bottles. Two levels of storage on one dinner-plate footprint, and the whole stand lifts off in one hand when the counter needs wiping.
2. Park Utensils Upright in One Crock Beside It
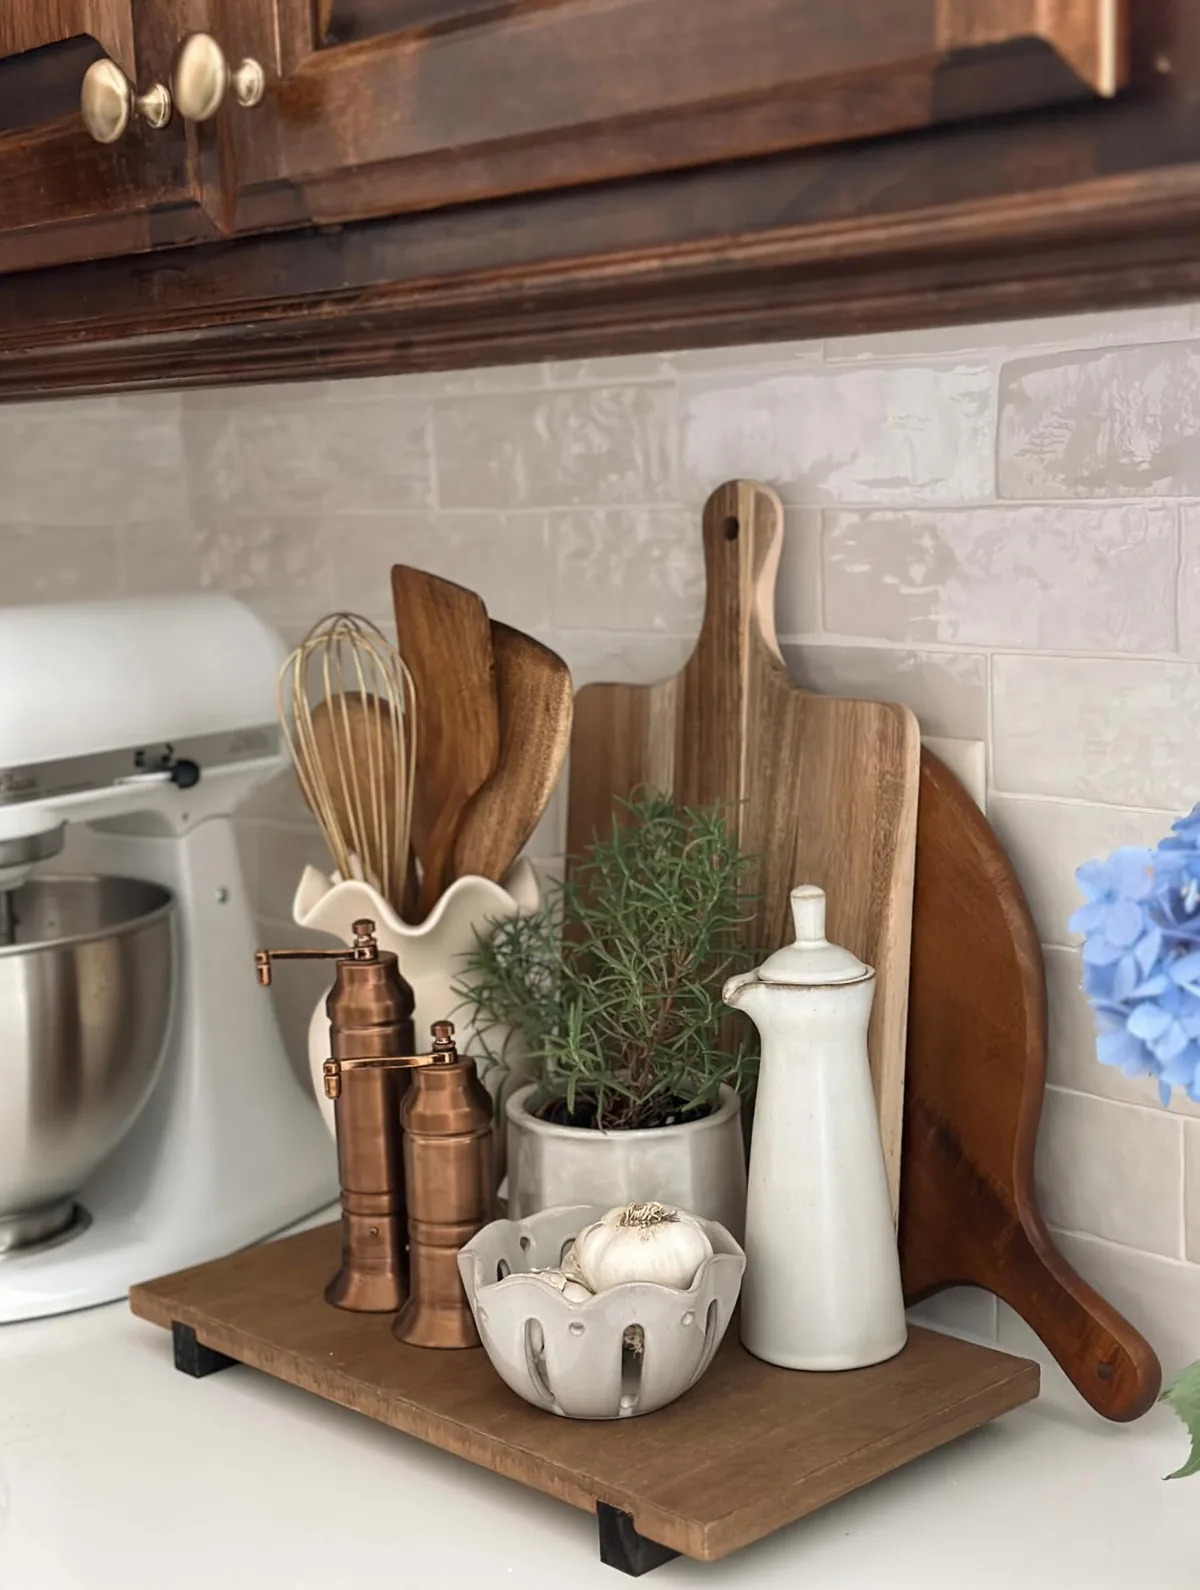
The second resident of the home base is the crock, and this photo shows the grown-up version: a low wooden riser board holding a white ruffled crock full of wooden spoons and a wire whisk, two copper salt and pepper mills in front, a small pot of rosemary and a little bowl of garlic beside them, with cutting boards leaning behind. Every tool stands upright, handles up, ready for one hand. Compare that with the standard rental drawer, where the ladle hides under the masher and both come out only after a small fight.
The crock has one strict rule: only daily tools earn a place. The spoons, the spatula, the whisk and the tongs you use most days, and nothing else. A crock that holds everything holds nothing well, because the tool you want is always at the bottom of the bunch. The rest of the tools can stay in the drawer without guilt. Notice the riser board under the group, too: it lifts everything a few centimetres, catches the drips and crumbs, and lets you slide the whole station to one side when the counter needs a proper wipe.
Place the crock close to the stove but out of the direct splash zone, and choose a crock with some weight to it, so it does not tip or skate when you pull a spoon out one-handed. The little herb pot beside it in the photo is worth copying: rosemary or basil costs almost nothing, survives on a windowsill rota, and its green note is what makes the station read as styled rather than stored. On moving day the crock packs into a box with the spoons still in it, which is the kind of packing a renter can love.
Crock rule: if a tool is not used most days, it does not live in the crock. Upright, handles up, one hand, no digging through a drawer while the pan waits.
3. Give Coffee Its Own Tray and Corner

Coffee is the worst sprawler on a small counter. The machine sits in one place, but the beans migrate, the mugs colonise the chopping zone, and the sugar ends up wherever the last cup was made. This kitchen shows the cure: against glossy green tiles and walnut cabinets, a cream espresso machine and its black grinder stand in one tight corner of the dark counter, cups waiting on top, a small steel jug beside them, and an open shelf above holding the bean jars. Nothing about coffee wanders, because coffee has been given a territory with borders.
The renter version needs no espresso machine and no shelf. A kettle, a cafetiere or a drip machine goes on one small tray at the far end of the counter, with the coffee jar and the two mugs you actually use standing beside it on the same tray. The tray is the border of the territory. Whatever fits on it stays out; anything extra goes back into a cupboard the same day. Keep the corner away from the sink, where puddles live, and away from the stove, where splashes land, and the morning routine gets its own clean stage.
Two habits keep the corner honest. Wipe the tray once a week, because coffee dust and drips are the clutter that creeps back first, and refill the jar on the tray instead of parking a big bag beside it. When friends come over, this little corner reads like a tiny cafe, and the rest of the counter is still clear for actual cooking, which is the entire point. The photo version has a fitted shelf; your tray does the same job and leaves with you.
Coffee corner, contained
1. Machine or kettle on one small tray, with the mugs and the coffee jar beside it
2. The tray is the border: whatever does not fit goes back in a cupboard
3. Far end of the counter, away from the sink puddles and the stove splash
Go Vertical Without Drilling: Small Kitchen Counter Storage Ideas

This narrow galley kitchen is the inspiration version, and it is worth being honest about that from the start. Pale blue cabinets, a patterned runner, and floor-to-ceiling open shelves along one wall holding glass jars of pasta and grains, woven baskets, bowls and books, with two more lit shelves above the stove. Those shelves are fixed to the walls, which is exactly what most rental leases say no to. Read the photo for its lesson rather than its hardware: the counters below all that shelving are almost empty, because everything in this kitchen lives one level up.
The renter translation keeps the lesson and drops the screws. Freestanding risers and corner shelves stand on the counter itself and lift the daily things into the air you already own. Jars stack two high where their shape allows it. The tall cupboard you cannot reach becomes the home of the rotation stock instead of a graveyard. The rule for the whole group is simple: use the space above the counter without touching the wall, because anything that stands on its own feet is deposit-safe.
Vertical storage has limits, and a small kitchen teaches them fast. Heavy things live low, where a slip does not matter. Daily things live at the front, where a hand lands without searching. Nothing stacks so high that taking one jar out becomes a small avalanche. The two ideas in this group lift the counter in the two safest ways: a corner riser that stands on the worktop, and the open-shelf system applied to whatever standing space you already have.
Group 2: Up, not out
Riser: a corner shelf that stands on the counter itself
Jars: the pretty dry goods on show, the packets out of sight
Wall: untouched, because nothing is screwed or drilled
4. Lift the Counter With a Freestanding Corner Riser
Here is the corner riser from the first group, close enough to read. It stands on the marble-look counter on its own white frame, no fixings anywhere. Along the top shelf sit glass jars with wooden lids: chilli flakes, dried herbs, a golden spice, peppercorns, and three tilted jars with steel lids tipped toward the cook. Below, oil and vinegar pourers stand in a wire caddy next to a tall jar of spaghetti, stacked spice jars and two white canisters. The corner of the counter, which in most small kitchens collects dead clutter and a sad plant, is holding a whole pantry layer.
Corners are where small counters waste the most space, because almost nothing you own is corner-shaped. A riser built for the corner is shaped for exactly that waste, which is why it gives back more room than it takes. Measure twice before buying: the width of the corner, and just as important, the height from the counter to the underside of the wall cupboards. The top shelf needs room for a jar to lift up and out, not merely to stand, and a riser that ignores that gap will annoy you every single day.
Load the riser by weight and by habit. Oils and the heaviest jars go low, spices and light jars go high, and the things you use daily sit at the front edge where a hand lands without thinking. The trailing plant spilling over the top corner in the photo is optional, but it earns its place: one green thing softens a whole wall of storage. When the lease ends, the riser lifts off in one piece and the corner is exactly as you found it, which cannot be said for a single screwed shelf.
Riser rules
Measure the corner and the gap under the wall cupboards before buying. Heavy jars live low, daily things sit at the front edge, and the top shelf needs room for a jar to lift out, not just to stand.
5. Use Open Shelves for the Pretty Dry Goods

Three long cream shelves run across a beadboard wall, and they are filled with glass jars: walnuts, crackers, pasta, seeds and beans in calm rows, wooden lids keeping the rhythm, stacked grey bowls and storage tins resting between them, and a small plant or two for life. Below, the counter is nearly bare, just clear canisters and wooden bowls. This is a fitted shelf wall from a landlord kitchen, and most renters cannot copy the shelves themselves. The copyable part is the system on them: dry goods out of their crumpled packets and into one family of jars, arranged where they can be seen and reached.
Renters have more standing room than they think. The system works on the freestanding riser from the last idea, on a sturdy tray, on top of the fridge, or along the one open shelf many rental kitchens already have above a sink or a worktop. A narrow trolley, if the floor allows one, becomes a pantry tower. The rule travels even when the shelves cannot: jars in one material, lids in one colour, and only foods you genuinely cook with on show, because a jar of something you never eat is just decor pretending to be storage.
One honest warning about open storage. Jars on show gather dust, and near a stove they gather a fine film of cooking grease, so keep this wall as far from the hob as your kitchen allows and wash the lids when you refill. Pretty dry goods only, too: the half-open crisp packet and the tangle of sauce sachets do not graduate to the shelf. They belong in a lidded box or a drawer, which is exactly where the next group takes us.
Shelf palette: clear glass, warm wooden lids, cream shelves, one green plant. With matching jars, the food itself becomes the decor.
Pretty Containers That Hide the Mess: Kitchen Counter Organization Ideas

This pale counter holds exactly three things: a cream kettle, its matching toaster, and one round wooden board leaning against the backsplash behind them. It looks styled, but the real trick is subtraction. Everything else in this kitchen has been put inside something, out of sight, in a container with a lid or a door. That is the theme of this group: containers that close, match and hide, so the counter itself can stay nearly empty while the kitchen still holds everything it needs.
Counter mess is rarely about how much stuff a kitchen holds. It is about variety. Ten different packets, tubs and bottles in ten different colours read as chaos even when they stand in a perfectly tidy row, because the eye has to read every label. One family of jars, one lidded basket and one leaning board give the eye a set instead, and a set reads as decor. The three ideas here replace visible packaging with containers that do their hiding in public, on the counter, where the mess used to live.
Start with an honest list of what lands on your counter every day, including the non-cooking arrivals: post, keys, a phone charger, the fruit that never makes it to a bowl. Give each category a container before buying anything pretty. The pretty part tends to follow on its own once nothing is homeless, because a counter with three calm groups on it already looks more styled than a counter with twelve interesting objects scattered across it.
Group 3: Hide it in public
Jars: staples decanted into one family, packets gone
Board: a leaning backdrop that doubles as a serving piece
Pair: the daily appliances matched, so they read as one set
6. Decant Staples Into Matching Jars
This is the shelf wall from group two again, seen from the jars point of view: row after row of glass jars with wooden lids, pasta, beans, nuts and crackers all visible, all calm, none of them shouting in branded packaging. Decanting is the least glamorous idea in this article and the one that changes a counter fastest. The moment flour, pasta and rice leave their rustling packets for jars, a shelf or counter stops looking like the back of a shop and starts looking like a pantry that somebody tends.
Three rules keep decanting painless. First, one jar family: the same glass and the same lid, bought in the sizes you need, because the matching is what does the visual work. Second, only decant what you finish regularly; the exotic grain bought once for one recipe can keep its packet in a cupboard and lose nothing. Third, keep a small funnel with the jars, because refilling day takes ten minutes when the tools live together and half an hour of sweeping when they do not. Plain jars work without labels if the contents are easy to tell apart; lookalike flours and sugars earn a small label each.
On the counter itself, keep the jar row short. Three to five daily staples, chosen from your real life: coffee, sugar, pasta, rice, oats, whichever are yours. The rest of the jar family can live on the riser or the shelf from group two, close enough to refill from. A short row on the worktop reads as decor and leaves room to cook; a long row reads as a shop display and quietly eats the very space this article is trying to give back to you.
Decanting rules
1. One jar family: same glass, same lid colour, no exceptions
2. Decant only what you finish often; odd packets stay in a cupboard
3. Three to five jars on the counter itself; the rest live on the riser
7. Lean a Big Wooden Board Behind the Counter Clutter

In this pale blue kitchen, a whole gallery of blue and white plates covers the wall, and down on the marble-look counter the corner holds the idea worth stealing: big wooden boards lean against the wall beside a dark vase of dried greenery, with a small wire egg basket and a striped tea towel nearby, and a cream range cooker with a blue pot standing at the right. The boards are doing quiet structural work. One tall, warm shape behind the small daily objects gives the corner a backdrop, and a corner with a backdrop reads as arranged instead of accumulated.
A leaning board does three jobs at once. It hides the messy seam where counter meets wall, the line of crumbs, sockets and tired grout that makes a rental kitchen look uncared for. It gives small items something to be grouped against, which is the difference between a display and a pile. And twice a day it comes forward to work as a serving board or an extra chopping surface. Nothing is fixed: it leans, and leaning is the renter best friend. Choose the biggest board your counter depth allows, because a small board behind big objects looks lost.
Look after it and it will look after the corner. Keep the leaning board out of the direct sink splash zone so it is not wet all day, and give it a light oiling now and then if it starts to look dry. If you own two boards, rotate which one leans, so each gets a rest and a dry day. In the photo, the boards echo the wooden table in front of them; in your kitchen, echo the wood of your tray, your stand or your riser, so the corner reads as one thought rather than several purchases.
Backdrop rule: small daily objects look like clutter on their own and like a display against one big board. Lean it against the wall; never fix it.
8. Keep Daily Appliances as a Matched Pair
Here is the group three counter again, close up: a cream kettle and a cream toaster, the same colour, the same chrome base, standing side by side on the white counter with one round wooden board leaning behind them. Two machines that most kitchens treat as pure function here read as a deliberate pair, almost as decor in their own right. Half of the effect is the matching. The other half is the emptiness around them: nothing else shares their stretch of counter, so the pair gets the calm frame it needs.
Renters who are not shopping for new appliances can still use the principle. Whatever you already own, group the daily two together in one spot: kettle and toaster, or coffee machine and grinder. Stand them in a straight line, tuck the cords behind them so no tails wander, and defend a hand width of clear counter on both sides. When an appliance does reach replacement time, choose the same colour family as its partner if you can; matching is cheapest when it is bought one piece at a time, over years, on purpose.
Keep the pair on the driest stretch of counter you have, away from the sink, and wipe the splash zone behind them once a week, because cream and chrome show every drip, which is also why they look so clean in photographs: somebody keeps the reset habit from group five. A third appliance can ask to join the line, but it has to prove it is used daily. The microwave potato gadget and the once-a-month juicer live in a cupboard between outings, and the pair stays a pair.
Pair logic
Two daily appliances, one colour family, one straight line, clear space on both sides. A pair reads as a set, and a set reads as decor instead of storage.
One Decorative Moment, Not Five: How to Decorate a Small Kitchen Counter

Along the long dark counter of this pink panelled kitchen stands a row of vases: wildflowers in glass, anemones in a small two-tone vase, a big bunch with eucalyptus, more flowers at the far end, and framed seascapes resting on the shelf above. It is, by any count, a lot of flowers. But notice what is missing: there are no other ornaments anywhere. No figurines, no candle army, no souvenir mugs on parade. The whole counter has one idea, repeated with confidence, and that restraint is exactly what makes it read as decor instead of clutter.
A small counter cannot afford five decorative ideas competing for the same square foot. It can afford one moment, done properly: a vase that gets refilled, a tray that holds a small still life, a bowl that changes with the season. Everything else on the counter should be there to work, and the working things look calmer for the company, the way one good painting calms a whole wall of shelves. When the one moment is in place, guests remember the kitchen as pretty without being able to say why, which is the best kind of decorating.
The two ideas in this group are the cheapest decor there is, because neither asks you to own much. One vase. One tray, the same tray idea from group one, turned decorative. The contents rotate, the footprint never grows, and the budget goes on flowers or fruit you were going to enjoy anyway. If your counter currently hosts a crowd of small pretty things, gather them, choose the best one, and give the rest a cupboard holiday. The counter will tell you within a day that it prefers the solo act.
Group 4: One moment
Vase: one bunch of flowers as the counter focal point
Tray: one still life that gathers the small pretty things
Swap: the contents rotate with the season; the footprint never grows
9. Set One Vase of Flowers as the Counter Focal Point
The pink kitchen counter is long, but the trick scales down to the smallest rental worktop: one generous vase, placed where the eye lands first, filled loosely and a little wild. Here it is anemones and garden flowers in glass and ceramic, repeated down the counter; at home it can be a single vase at the end of the worktop or beside the sink. Flowers matter less than the habit behind them. A tall vase lifts the eye off the counter surface, and a counter the eye leaves quickly is a counter that looks tidy even on an ordinary Tuesday.
Choose the spot by sightline, not by spare space: stand in the kitchen doorway and note where you look first. That is the vase spot. Keep it out of the chopping zone and away from the hob, since heat wilts flowers fast and petals in the dinner help nobody, and pick a vase with a heavy base, because small counters get elbowed and a narrow jug will not survive the year. Glass shows the water level and the stems, which keeps you honest about changing the water; ceramic hides both, which some weeks is a mercy.
Be honest about the budget, too. One supermarket bunch, split across the single vase and nothing else, looks richer than the same bunch lost among six other ornaments. When the flowers fade, the spot does not have to empty: dried stems, a branch of eucalyptus or a few stems of greenery from the market keep it filled for weeks at almost no cost. The vase stays, the contents change, and the kitchen always has its one living thing, which is the whole pattern this group is built on.
Focal palette: soft pink blooms, cream ceramic, leaf green, deep wood. One vase carries the colour for the whole counter.
10. Style a Single Round Tray as the Still Life
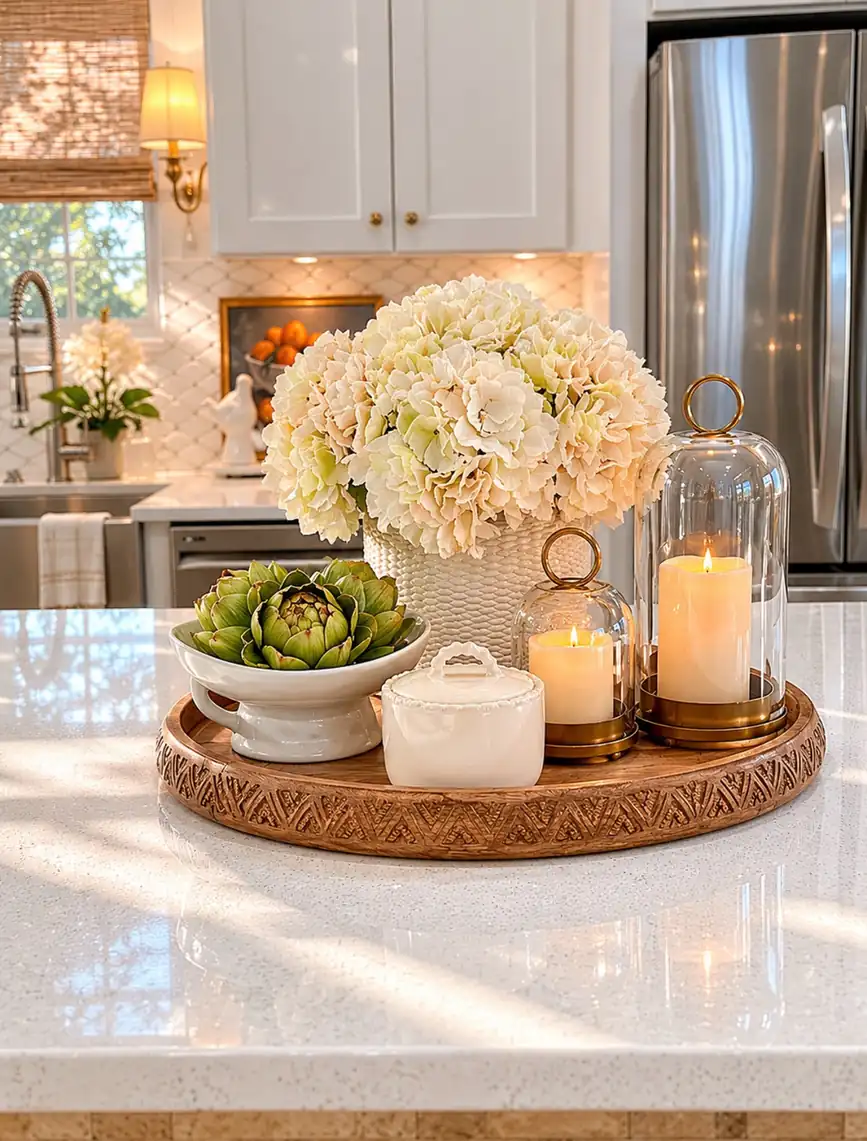
On this white island counter, one large round carved wooden tray is holding everything: a woven basket of cream hydrangeas, a white footed bowl with green artichokes, a small lidded pot, and two lit candles resting under glass domes with brass bases. Five objects, and the counter still reads clear, because the tray draws a border around them. Everything inside the rim counts as one thing; everything outside it is empty, wipeable worktop. This is the group one tray rule with its sleeves rolled the other way: the same discipline, turned from storage into display.
Build your own still life in threes. Something tall, like the flowers or a small plant. Something low and useful, like the footed bowl that can hold fruit, eggs or the garlic. And something with a lid or a glow, like the lidded pot or a candle, which gives the group its finished edge. Put the tray on the stretch of counter you do not cook on: the end of an island, the bit beside the fridge, the corner by the wall. Keep it small enough to lift away in one move on a big cooking day, because a still life that cannot be moved will eventually be worked around, resented and dismantled.
Kitchen counter decor ideas usually fail by spreading. One ornament lands here, another there, a third joins them, and the counter is full again without anyone deciding it should be. The tray is the discipline that stops the spread, because decor now has an address and a fence. When a new pretty thing arrives in the kitchen, it goes on the tray and something else comes off it. That is the decorative version of the one in, one out rule that ends this article, and it keeps the still life a still life instead of a slow reunion of everything you own.
Still life maths
Something tall, something low, something that glows: three things on one tray count as a single object, and the rest of the counter stays empty.
11. Rotate One Seasonal Bowl or Candle

The same kind of round tray, this time in a sister kitchen with grey cabinets: pink roses in a textured white vase, two cream pillar candles on brass stands at different heights, a small lidded pot and a white jug, all inside the rim. The tray, the vase and the candles are permanent residents. The roses are the season talking. Next month the same spot could hold a bowl of lemons, a cluster of small pumpkins or a handful of pinecones, and the counter would feel freshly decorated without gaining a single new object of furniture.
Rotation is how a small kitchen escapes two traps at once: the boredom trap, which says buy more decor, and the clutter trap, which says keep every bit of it out. Keep a tiny rotation stock together in one box in a cupboard: a spare candle, a good bowl, and whatever fillers the year offers, from spring eggs to autumn cones to a string of fairylights in the dark months. Swapping takes two minutes, costs nothing after the first small stock, and satisfies the urge to redecorate in the healthiest way there is.
Keep the flame geography sensible. Candles live on the tray, in the open part of the counter, well away from the hob, the curtain and anything that flaps in a draught, exactly as both candles in this photo sit far from the cooker. Near anything risky, the flameless kind gives the same glow with no worries. When the season turns, wash the tray, swap the contents, straighten the stands, and the kitchen feels tended. Tended, more than decorated, is the feeling people are actually chasing when they style a counter.
Rotation rules
1. The tray, the vase and the candle stay; only the contents change
2. Keep the swap stock together in one small box in a cupboard
3. Candles live on the tray, away from the hob and anything that flaps in a draught
The Daily Reset That Keeps a Small Kitchen Counter Clear

Above this farmhouse sink hangs an entire wall of blue and white plates, and yet the counters below stay calm: a pitcher of lavender, one low tray holding small cups, a woven basket of greenery, and under the counter, wicker baskets quietly holding the rest of the kitchen. A room this decorated stays this clear for one reason only. Everything in it has a home, and somebody puts it back. That habit is the final group, and it is the one that protects all the others, because decor without a reset is just clutter waiting for a busy week.
Counter decor fails in week two, when real life starts landing again: the post, the keys, a charger, the saucepan that now lives by the sink because the cupboard is full. None of that is a character flaw; it is what flat surfaces are for. The reset is the counter closing routine, two minutes at the end of the day, when everything goes back on its tray, in its jar, into its basket. It is deeply boring, and it is the whole difference between a styled kitchen and a photographed one.
The single idea in this group pairs the reset with a gate at the border: one in, one out, for anything that wants to live on the counter permanently. Together they keep the twelve ideas from slowly drowning under good intentions and new gadgets. Every counter article owes you an honest ending, and this is it: the styling takes an afternoon, the habit takes two minutes a day, and the habit is the part that works.
Group 5: The reset
Two minutes: everything back on its tray, in its jar, in its basket
One in, one out: a new gadget joins the counter only when an old one leaves it
Morning test: you can wipe the whole worktop without moving a village
12. Run a Two-Minute Reset and a One-In-One-Out Rule
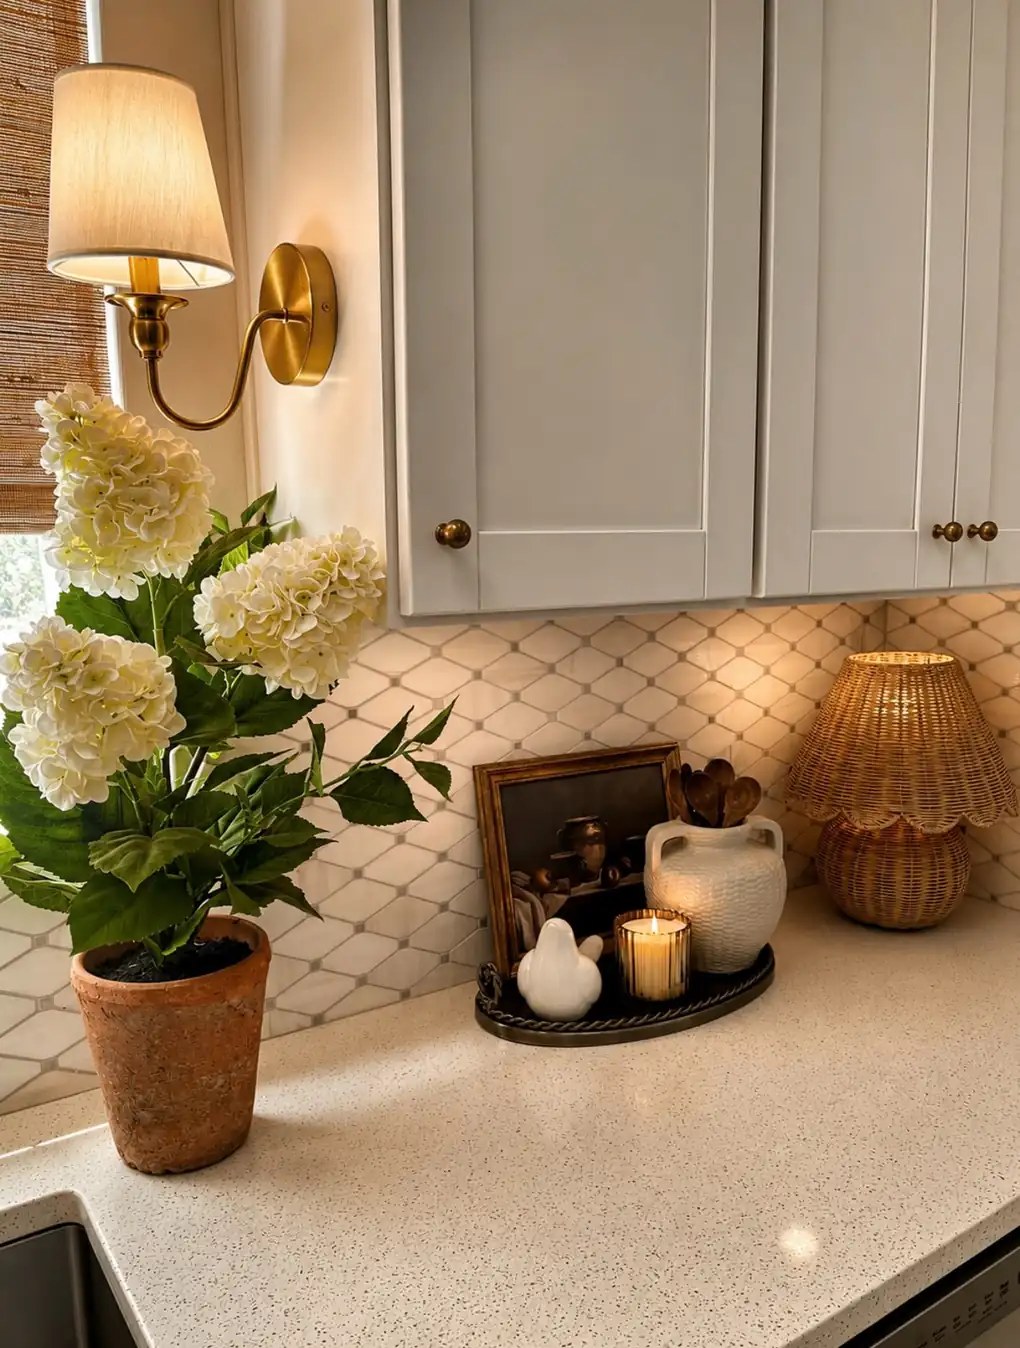
This corner of a pale grey kitchen is what a kept reset looks like at rest. At one end, a terracotta pot of white hydrangeas. In the middle, a small dark tray holding a framed picture, a white jug of wooden spoons and a lit candle. At the other end, a little lamp with a woven shade, glowing. Nothing is homeless and nothing is extra: every object is either on the tray or is the one decorative moment, and the stretch of counter between them is empty and wipeable. Nobody tidied this for a photograph; it just never got untidy for long.
The reset itself is a short walk. After the evening wash-up, travel the counter once, in one direction. Strays go back on their trays, jars get their lids straightened, the board returns to leaning, the spoons return to the crock. Post and keys go to their basket or hook, never to the counter, because a worktop collects exactly what habits allow it to collect. Time it honestly once: two minutes is enough when the homes exist. The first week may take five while the homes are still being learned, and that is fine; it shortens fast.
One in, one out guards the future. A new gadget, a mug tree, a prettier ornament may move onto the counter only when something of a similar size moves off it, to a cupboard, a charity bag or a friend kitchen that has room. A small counter is a fixed country, and its population has to be governed, or the twelve ideas drown one innocent purchase at a time. Run the pair of habits for a month and the counter stays the way the photos in this article look. That, in the end, is the whole point of decorating it.
The whole system in one line: a home for everything, two minutes a day, and a door policy for new things. The decor survives because the habit does.
5 Mistakes That Make a Small Kitchen Counter Worse
1. Filling every inch. If every stretch of counter holds something, there is nowhere to set down a hot pan or a bag of shopping, and the mess lands on top of the decor instead. One clear run, at least the length of your biggest board, is a tool, not a waste of space.
2. Buying decor before homes. Ornaments added to a counter with no trays, stands or jars just join the clutter with better looks. Homes first, from groups one to three, and the decorative moment after, in group four.
3. Ten different containers. A jar here, a tub there, a souvenir tin from a holiday: mismatched containers read as mess even in a straight row, because every label shouts at once. One jar family, one lid colour, no exceptions.
4. Blocking the sockets and the sink. Trays drift over the week. Keep the reset honest about geography: nothing tall in front of a socket, nothing precious in the splash zone, and nothing flammable anywhere near the hob.
5. A weekly excavation instead of a daily reset. The big Saturday clear-out feels virtuous and changes nothing by Tuesday, because clutter is a daily arrival. Two minutes nightly beats two hours monthly, every single time.
FAQs About Small Kitchen Counter Decor Ideas
How can kitchen counter decor ideas work without losing work space?
By decorating upward and in groups instead of spreading out. A tiered stand and a corner riser hold the daily things on one small footprint, jars gather the packets into one row, and the appliance pair shares one stretch. Then protect one clear run of counter, at least the length of your biggest board, and treat it as a tool rather than empty space waiting to be filled. Decor that respects that clear run never costs you cooking room.
What should live on the counter beside the stove?
Only what cooking reaches for: the stand with the oil, salt and daily spices, the crock of spoons and spatulas, and a board leaning behind them. Keep all of it out of the direct splash line where you can, choose things that wipe clean in seconds, and keep anything flammable, meltable or made of paper well away from the burners. A tool used weekly rather than daily belongs in a drawer, not in the hot zone.
How many things should stay on a small counter all the time?
Count homes, not objects. Most small counters settle at five homes: the tiered stand, the utensil crock, a short row of three to five jars, the matched appliance pair, and one decorative moment such as a vase or a styled tray. Everything inside those homes can be as full as it needs to be. Anything that cannot fit into a home goes in a cupboard, because homeless objects are what clutter actually is.
Which single buy helps a tiny counter most?
The tiered stand, and it is not close. It takes the bottles and jars that sprawl the widest and stands them on the footprint of a dinner plate, at two heights, where you can see everything at a glance. A clear counter also makes the whole kitchen read bigger than it is; our small room guide works on the same principle for the rest of a small home.
What can I do about a stained or dated counter surface?
First, cover most of it with work: a big leaning board, a tray and a riser hide more of a tired worktop than you would expect. For the surface itself, contact paper ideas include rental-safe ways to cover a counter so it looks intentional again. And if the clear-out inspires you to fix the floor below it, the peel and stick tile guide is the matching no-damage project.
Will any of these ideas damage the counter or risk my deposit?
No. Everything in this article stands on its own feet, leans against the wall or lifts straight off, and nothing is drilled, glued or fixed. Felt pads under a riser stop scratches, trays catch the drips that stain, and boards protect the stretch behind the stove. For the cupboard doors below the counter, our cabinet cover guide covers the same renter-safe approach, so the whole kitchen can look better and still hand back clean.
What not to put on a kitchen counter?
Do not put things you rarely use on a kitchen counter: the bread maker, the juicer, the spare blender and the pile of paper that never gets filed. They eat the work space you need for cooking and they make the counter look busy even when it is clean. Keep only the daily tools — oils, spices, the crock, the coffee kit — and store the rest in a cupboard until you need it.
What are some modern ideas for kitchen counter decor?
Modern kitchen counter decor is simple and calm: one colour family, clean lines and very little on show. Use a wooden tray or a stone riser to group the daily jars, add a matte black or brass tap detail, and keep the splashback plain so the few things on the counter stand out. Skip the busy patterns and let the countertop itself carry the look.
One Last Thing
A small counter does not need more space; it needs fewer, better decisions. Give the daily things a tiered home, hide the packets in matching jars, let one vase or one tray do all the decorating, and keep the two-minute reset. If you buy one thing from this whole article, make it the tiered bamboo countertop organizer tray: it corrals oils, spices and utensils into one pretty footprint, and it changes the counter the day it arrives. Our budget decorating ideas will help you pace the rest of the buys. Everything here lifts off, leans or packs away, so the kitchen you hand back is the kitchen you were given, and the one you lived in was entirely yours.

Elora Vania here, founder and Senior Editor of Home Aure. With years of experience in interior styling and home decor, I created this site to bring thoughtful, practical design advice to real homes—helping you create spaces that feel warm, personal, and beautifully lived-in.